本文共 9340 字,大约阅读时间需要 31 分钟。
文章目录
〇、写在前面
本篇是基于前两篇Demo进行的登录认证源码流程的讲解,可以先大致看看前两篇,能主动来了解源码,我想对使用Spring Security也有一定经验了,肯定能很快熟悉这个Demo,这里附上项目地址:,以及前两篇博文地址:
一、登录授权流程
前面整体框架设计的源码文章中提到,其实请求进来就是走一条我们配置好的过滤器链,而登录授权这个过滤器(
UserAuthenticationFilter)也是过滤器链中的一环,现在我们只关注这个过滤器是怎么走的,关于过滤器链上的其他过滤器我们后面文章慢慢分析。Demo中配置的过滤器链: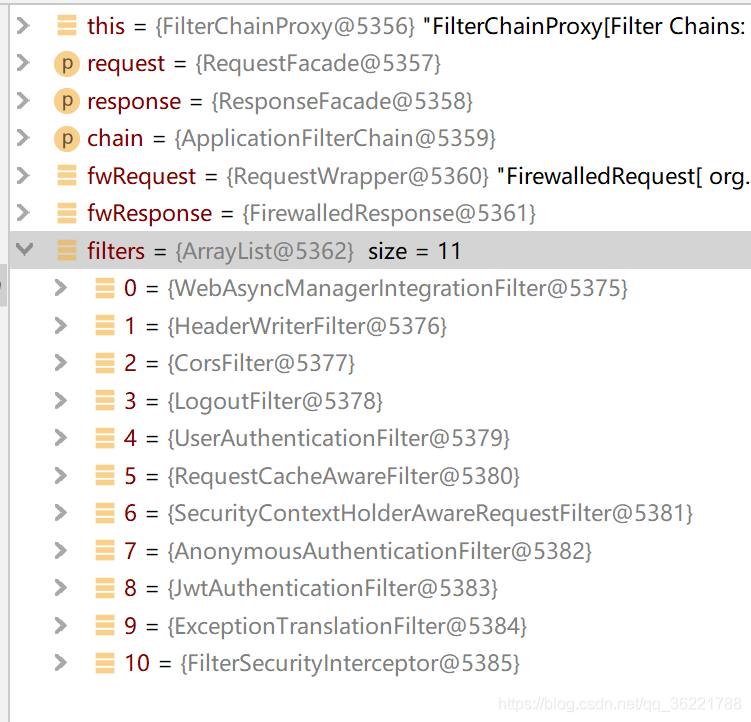
流程概述
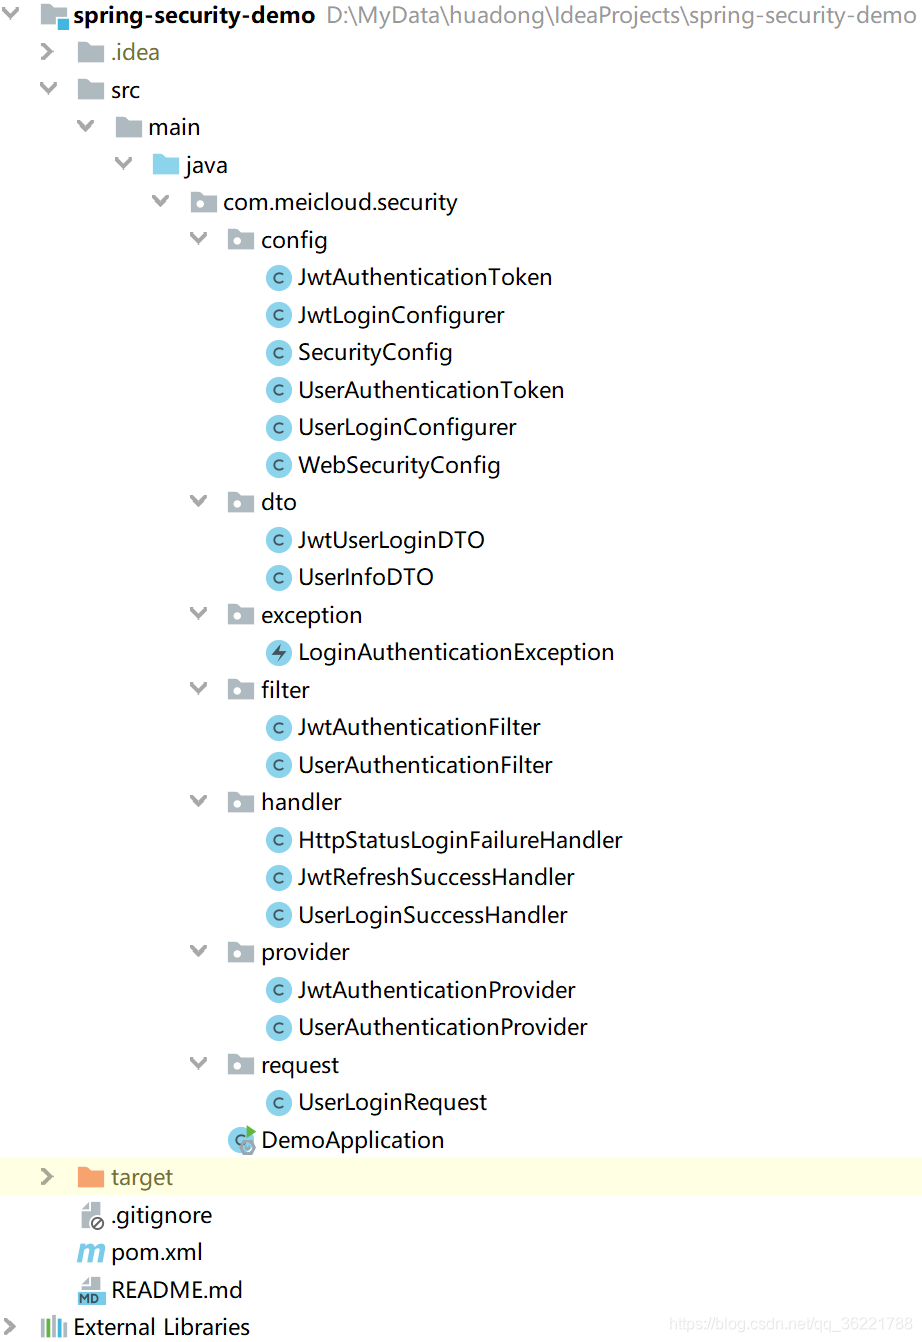
- 先看看项目大致的类
- 对于登录授权,请求会先进入过滤器,再使用Provider认证处理,最后进行成功/失败处理器处理,所以大致流程是这样的:
➜ filter:
➜ provider:UserAuthenticationFilterUserAuthenticationProvider➜ handler:UserLoginSuccessHandler/HttpStatusLoginFailureHandler
- 虽然顺序是这样,但是并不是filter中调用provider,provider中调用handler,控制这一流程的是其实是UserAuthenticationFilter的父类
AbstractAuthenticationProcessingFilter
AbstractAuthenticationProcessingFilter
- 这个类里面主要关注
doFilter()方法,这里就是控制着整个登录认证的流程,源码:
public void doFilter(ServletRequest req, ServletResponse res, FilterChain chain) throws IOException, ServletException { HttpServletRequest request = (HttpServletRequest) req; HttpServletResponse response = (HttpServletResponse) res; // 判断请求是否能被这个过滤器处理,不能的话直接进入下一个过滤器 if (!requiresAuthentication(request, response)) { chain.doFilter(request, response); return; } if (logger.isDebugEnabled()) { logger.debug("Request is to process authentication"); } Authentication authResult; try { // 这个方法就是由子类实现,是在我们 UserAuthenticationFilter 中实现的 authResult = attemptAuthentication(request, response); if (authResult == null) { return; } sessionStrategy.onAuthentication(authResult, request, response); } catch (InternalAuthenticationServiceException failed) { logger.error( "An internal error occurred while trying to authenticate the user.", failed); // 失败处理器 unsuccessfulAuthentication(request, response, failed); return; } catch (AuthenticationException failed) { // 失败处理器 unsuccessfulAuthentication(request, response, failed); return; } if (continueChainBeforeSuccessfulAuthentication) { chain.doFilter(request, response); } // 成功处理器 successfulAuthentication(request, response, chain, authResult); } - 这个方法也简单,主要就是调用了一个认证方法
attemptAuthentication()去认证,如果认证过程中有异常,就会被catch然后被失败处理器处理,认证成功就走主流程最后被成功处理器处理,处理完之后不会再走下面的过滤器。 - 熟悉设计模式的会发现这里是个典型的
模板方法模式,这里定义了一个算法骨架,而具体的实现都由子类去完成,包括认证逻辑(attemptAuthentication())、失败处理(unsuccessfulAuthentication())、成功处理(successfulAuthentication())实际上都分别被我们定义的UserAuthenticationFilter、UserLoginSuccessHandler、HttpStatusLoginFailureHandler进行实现处理。
好像忽略了一个类,流程中其他类都有被调用,那
UserAuthenticationProvider呢?我们看看UserAuthenticationFilter类中的attemptAuthentication()方法:
@Override public Authentication attemptAuthentication(HttpServletRequest request, HttpServletResponse response) throws AuthenticationException, IOException, ServletException { // TODO 这里的逻辑主要有两个作用,一个是进行初步的校验,一个是组装待认证的Token,举几个例子: // 1.微信授权登录:客户端会传过来一些加密串,这里逻辑主要解密这些加密串的数据获取unionId、openId、手机号以及用户昵称头像等基本信息, // 然后组装Token传给Provider进行下一步认证,如果这里报错直接就返回异常,不会进行下一步认证。 // 2.手机短信验证码登录:这里主要验证短信验证码的正确性,然后组装Token传给Provider进行下一步认证,如果短信验证码错误直接抛异常 // 3.账号密码图形验证码登录:这里主要验证图形验证码的正确性,然后组装Token传给Provider进行下一步认证,如果图形验证码错误直接抛异常 // ... // =================================================== 示例 =============================================== String body = StreamUtils.copyToString(request.getInputStream(), StandardCharsets.UTF_8); String mobile = null, password = null, verifyCode = null; if(StringUtils.hasText(body)) { UserLoginRequest loginRequest = JSON.parseObject(body, UserLoginRequest.class); mobile = loginRequest.getMobile(); password = loginRequest.getPassword(); verifyCode = loginRequest.getVerifyCode(); } // TODO 这里验证图形验证码 verifyCode 是否正确 UserAuthenticationToken token = new UserAuthenticationToken( null, mobile, password); // 这里进行下一步认证,会走到我们定义的 UserAuthenticationProvider 中 return this.getAuthenticationManager().authenticate(token); } - 主要看最后一句,它实际调用的是
ProviderManager的authenticate()方法,来了解下这个类。
ProviderManager
authenticate()方法
public Authentication authenticate(Authentication authentication) throws AuthenticationException { Class toTest = authentication.getClass(); AuthenticationException lastException = null; Authentication result = null; boolean debug = logger.isDebugEnabled(); for (AuthenticationProvider provider : getProviders()) { if (!provider.supports(toTest)) { continue; } if (debug) { logger.debug("Authentication attempt using " + provider.getClass().getName()); } try { result = provider.authenticate(authentication); if (result != null) { copyDetails(authentication, result); break; } } catch (AccountStatusException e) { prepareException(e, authentication);() // SEC-546: Avoid polling additional providers if auth failure is due to // invalid account status throw e; } catch (InternalAuthenticationServiceException e) { prepareException(e, authentication); throw e; } catch (AuthenticationException e) { lastException = e; } } } - 这里循环所有的
provider,每个provider都调用自己的supports()方法判断是否支持认证,能支持认证的话就执行自己的authenticate()方法进行认证 - 这里是典型的
策略模式+委托模式的组合使用案例,如下UML类图,AuthenticationProvider为策略接口,右边三个就是实际的策略类,实现了策略接口以及实现了supports()和authenticate(),中间两个就是我们自己定义的Provider,这就是为啥我们要实现AuthenticationProvider接口。 - 左边的
ProviderManager就是这些策略的委托类,所有的provider都会被收集到该类的providers属性中,然后认证的时候由委托类循环所有策略,支持认证的话再调用对应的策略去认证。
- 所有的策略是什么时候被加入到委托类的
providers中的?
在配置主类
WebSecurityConfig中我们配了一段这个代码,就是在这里配置的。
@Override protected void configure(AuthenticationManagerBuilder auth) throws Exception { auth.authenticationProvider(userAuthenticationProvider()) .authenticationProvider(jwtAuthenticationProvider()); } @Bean protected AuthenticationProvider userAuthenticationProvider() throws Exception { return new UserAuthenticationProvider(); } @Bean protected AuthenticationProvider jwtAuthenticationProvider() throws Exception { return new JwtAuthenticationProvider(securityConfig); } ProviderManager是什么时候被谁创建的?
在 中我们留下个小悬念,主要建造者就这三个,
WebSecurity建造的是核心过滤器FilterChainProxy,HttpSecurity建造的是核心过滤器里的其中一条过滤器链,而AuthenticationManagerBuilder就是本次的主角了,它就是建造ProviderManager用的。(图片内容为之前文章截图)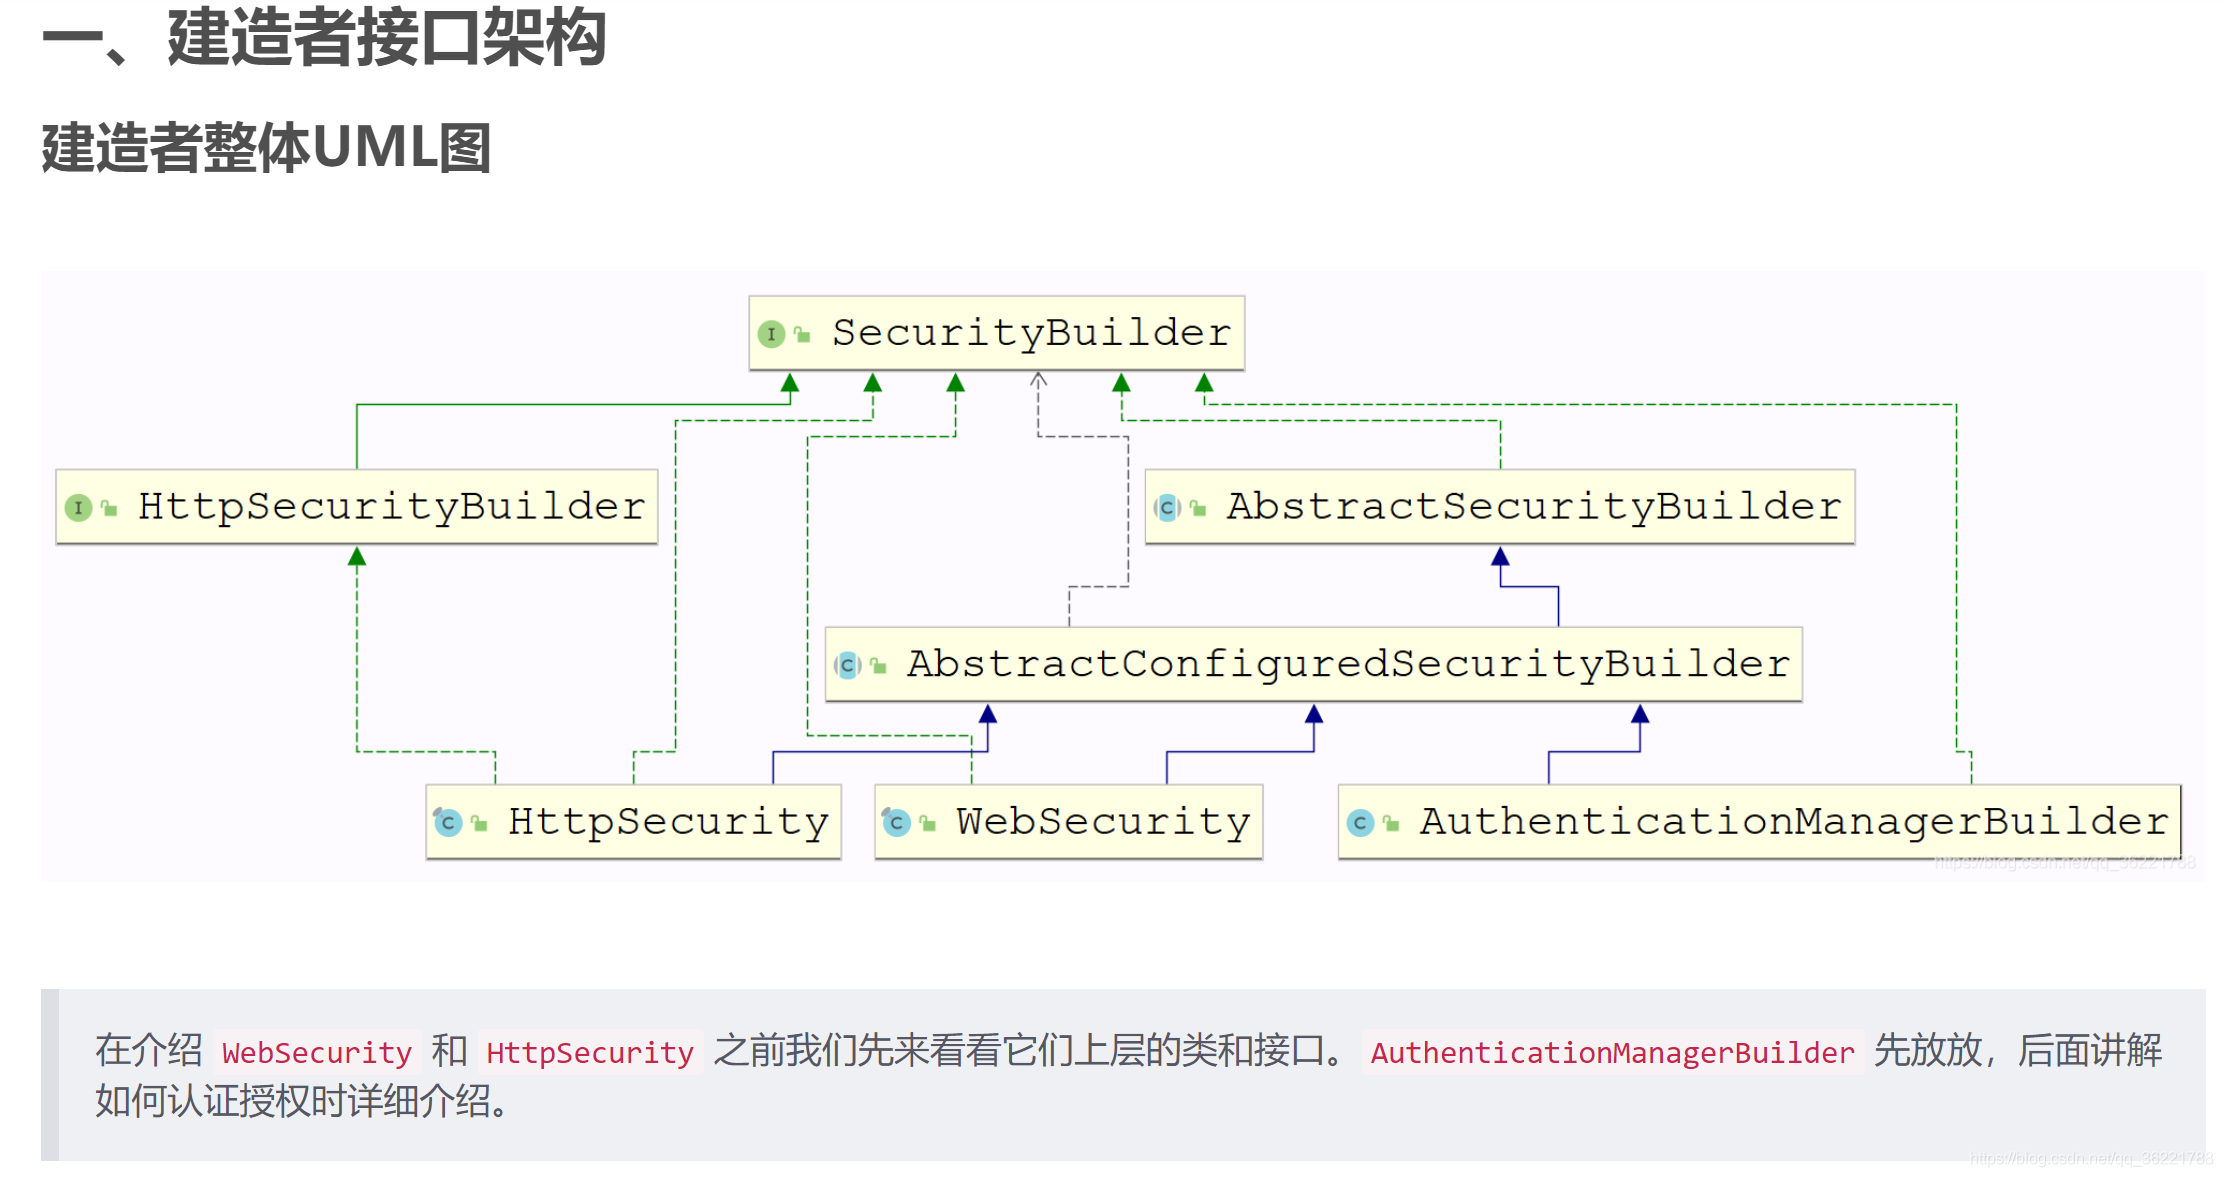
ProviderManager它是由AuthenticationManagerBuilder在启动的时候被创建的,它实现了performBuild()方法,关于启动流程请看之前的文章,文末会放出地址。
@Override protected ProviderManager performBuild() throws Exception { if (!isConfigured()) { logger.debug("No authenticationProviders and no parentAuthenticationManager defined. Returning null."); return null; } ProviderManager providerManager = new ProviderManager(authenticationProviders, parentAuthenticationManager); if (eraseCredentials != null) { providerManager.setEraseCredentialsAfterAuthentication(eraseCredentials); } if (eventPublisher != null) { providerManager.setAuthenticationEventPublisher(eventPublisher); } providerManager = postProcess(providerManager); return providerManager; } 二、接口认证流程
流程概述
- 认证流程其实和登录授权的流程几乎一致,大致也是类似以下,请参考具体登录流程
➜ filter:
➜ provider:JwtAuthenticationFilterJwtAuthenticationProvider➜ handler:JwtRefreshSuccessHandler/HttpStatusLoginFailureHandler
但是,但是,还是有区别的,会发现登录授权和接口认证的两个filter继承了不同的类,来看看为什么这么处理。
为什么继承不同的类?
先思考个问题:
登录授权的目的和接口认证的最终目的是啥?
- 登录授权的目的是
获取JWT令牌,接口认证的目的是访问后台资源,只不过访问后台资源之前需要认证请求的合法性,即校验JWT成功之后才能访问后台资源。 - 再来回顾请求会走过的过滤器链:
- 对于登录授权,
请求不会走完所有的过滤器,它按顺序走前面的过滤器一直走完UserAuthenticationFilter过滤器就直接返回了,不再继续往下走。 - 对于接口认证,
请求会走完所有的过滤器(前提不会在认证的时候报异常,比如报JWT不存在的话也会直接返回报错信息),并且是由最后一个FilterSecurityInterceptor过滤器来判断最终是否能否访问后台接口资源的,也就是说走完了JwtAuthenticationFilter过滤器还会继续往下走,直到最后一个过滤器判断请求不合法,或者请求认证成功返回接口资源。 - 前面提到
AbstractAuthenticationProcessingFilter的控制流程(doFilter())不会继续往下走过滤器,所以这就是为什么UserAuthenticationFilter能继承AbstractAuthenticationProcessingFilter而JwtAuthenticationFilter并不能继承这个,不会往下走过滤器也就是不会调用:
chain.doFilter(request, response);
- 所以,接口认证的
JwtAuthenticationFilter需要自己去实现控制认证流程,来看一下他的doFilter()方法:
@Override protected void doFilterInternal(HttpServletRequest request, HttpServletResponse response, FilterChain filterChain) throws ServletException, IOException { // 是否是白名单URL if (permissiveRequest(request)) { filterChain.doFilter(request, response); return; } Authentication authResult = null; AuthenticationException failed = null; try { String token = getJwtToken(request); if (StringUtils.isNotBlank(token)) { JwtAuthenticationToken authToken = new JwtAuthenticationToken(JWT.decode(token)); authResult = this.getAuthenticationManager().authenticate(authToken); } else { failed = LoginAuthenticationException.JWT_IS_EMPTY; } } catch (JWTDecodeException e) { logger.error("JWT format error", e); failed = LoginAuthenticationException.JWT_FORMAT_ERROR; } catch (InternalAuthenticationServiceException e) { logger.error("An internal error occurred while trying to authenticate the user."); failed = LoginAuthenticationException.AUTH_ERROR; } catch (AuthenticationException e) { failed = e; } if (authResult != null) { successfulAuthentication(request, response, filterChain, authResult); } else { // 是否是匿名用户访问的URL if (!anonymityRequest(request)) { unsuccessfulAuthentication(request, response, failed); return; } } filterChain.doFilter(request, response); } - 具体实现在前两章已说明,主要看最后一句,认证完之后还会往下走剩下的过滤器。当然如果认证的时候就已经报错了,也是直接return,不会继续走剩下的过滤器。
三、总结
- 登录授权和接口认证其实主要就是调用两个Filter的 dofilter() 方法,里面都包含了流程上的控制。
- 关注
ProvierManager类,主要作用是Provider的委托类。 - 注意登录授权和接口认证Filter的实现,注意整体上的流程,登录授权的目的是获取JWT令牌,不会再走剩下的过滤器,接口认证成功的话会走完所有的的过滤器,再返回后台资源。
末、系列文章
转载地址:http://wrer.baihongyu.com/